Thành phần Navigator
Khi viết một ứng dụng di động, bất kể bạn viết cho IOS hay Android. Navigator là thành phần không thể thiếu. Vì màn hình của thiết bị di động rất nhỏ so với màn hình máy tính, bạn không thể hiện tất cả thông tin của app trên một màn hình. Vì vậy, Navigator rất quan trọng với người sử dụng để di chuyển từ màn hình này đến màn hình khác trong ứng dụng.
Nhìn chung thì thành phần Navigator trên IOS và Android đều có sự tương đồng về mặt giao diện và chức năng. Ví dụ Tab trên IOS sẽ giống Bottom Navigation Bar trên Android. Ngoài ra cò có một số chức năng riêng (native design pattern) chỉ dành cho từng loại Platform. Ví dụ Navigation Drawers là thành phần có sẵn cho Android, với IOS chúng ta phải giả lập giao diện tương tự. Nói chung là ta có thể giả lập những thành phần này theo yêu cầu.
Navigator trong React Native project
Nếu bạn mới bắt đầu tập viết ứng dụng với React Native hoặc đã biết về React Native. Tôi chắc rằng bạn đã đặt câu hỏi -- “mình sử dụng thành phần Navigator gì đây?”. Và thử google thì sẽ có một vài lựa chọn: React Navigation, Navigator, NavigatorIOS, Ex-Navigation, Native Navigation, React Native Router Flux, NavigationExperimental, React Router Native và React Native Navigation.

Hai loại Navigator
Navigator trong React Native được chia làm 2 loại:
- Javascript navigator: Là những package được viết hoàn toàn bằng javascript và được chạy trên môi trường javascript.
- Native navigator: Được viết bằng ngôn ngữ chính của từng platform. (ví dụ IOS có Objective-C hay Android có Java) và nó được kết nối React Native thông qua javascript API. Sự khác biệt chính là tách navigation ra khỏi javascript thread. Giúp có cảm giác sử dụng đồ chính chủ hơn la đồ giả lập. Từ đó sẽ tối ưu performance và mượt hơn.
Như đã thảo luận, có nhiều sự lựa chọn cho Navigator. Mình sẽ không bàn về ưu và khuyết điểm của từng thư viện trong bài viết này. Cá nhân mình thích sử dụng thư viện dành cho native hơn. Mình đã sử dụng thư viện React Native Navigation cho các project của khách hàng và cảm thấy rất tốt.
React Native Navigation
Được phát triển bởi Wix, một cái tên rất được tin cậy. React Native Navigation hỗ trợ 100% native navigation và cross-platform. Hiện tại phiên bản chạy ổn định nhất vẫn là 1.1.x, hỗ trợ react-native 0.43 trở lên. Ngoài ra phiên bản 2.0 cũng đang được tích cực hoàn thành. Bạn có thể sử dụng nhưng theo mình một số chức năng vẫn còn thiếu. Vì vậy bài viết này đề cập đến phiên bản 1.1.x. Còn phiên bải 2.0 sẽ cập nhật thêm.
Sử dụng package này sẽ cho bạn có trải nghiệm ngang tầm với navigation được viết bằng native language. Điều mà theo mình navigator viết bằng javascript không thể nào giả lập giống 100% được.
Tạo project react native mới
Gỉa định rằng bạn đã cài sẵn react native và môi trường để chạy. Và bạn cũng cần có một kiến thức nhất định về react-native, mình sẽ hướng dẫn theo dạng thực hành nên sẽ không nói về lý thuyết. Dùng lệnh react-native init ReactNativeNavigationExample để tạo một project mới.
Cài phiên bản react-native-navigation 1.1.x cho react-native <=0.51
yarn add react-native-navigation@latest hoặc npm install --save react-native-navigation@latest
Link package trong android project
Thêm đoạn code dưới đây vào file settings.gradle nằm trong thư mục android của project.
rootProject.name = 'ReactNativeNavigationExample'

include ':app'
include ':react-native-navigation'
project(':react-native-navigation').projectDir = new File(rootProject.projectDir, '../node_modules/react-native-navigation/android/app/')
Tìm và cập nhật dependencies cho file build.gradle trong thư mục android/app của project
android {
    compileSdkVersion 25
    buildToolsVersion "25.0.1"
    ...
}
dependencies { compile fileTree(dir: "libs", include: ["*.jar"]) compile "com.android.support:appcompat-v7:23.0.1" compile "com.facebook.react:react-native:+" compile project(':react-native-navigation') }
Mở file MainActivity.java trong thư mục android/app/src/main/java/com/reactnativenavigationexample
import com.reactnativenavigation.controllers.SplashActivity;

public class MainActivity extends SplashActivity {
...
}
Cũng trong thư mục đó mở file MainApplication.java thêm vào đoạn code sau đây
package com.reactnativenavigationexample;

...
import com.reactnativenavigation.NavigationApplication;
public class MainApplication extends NavigationApplication implements ReactApplication {

  private final ReactNativeHost mReactNativeHost = new ReactNativeHost(this) {
   ...
  };

  @Override
  public ReactNativeHost getReactNativeHost() {
    return mReactNativeHost;
  }

  ...
  @Override
  public boolean isDebug() {
    // Make sure you are using BuildConfig from your own application
    return BuildConfig.DEBUG;
  }

  protected List getPackages() {
    // Add additional packages you require here
    // No need to add RnnPackage and MainReactPackage
    return Arrays.asList(
            // eg. new VectorIconsPackage()
    );
  }
  @Override
  public List createAdditionalReactPackages() {
    return getPackages();
  }

  @Override
  public String getJSMainModuleName() {
    return "index";
  }
}
Link package trong iOS project
Với iOS bắt buộc bạn phải sử dụng hệ điều hành mac os và có xcode cài đặt sẵn.
Vào thư mục ios của project chính trên Finder. Nhấn đúp chuột vào file ReactNativeNavigationExample.xcodeproj để mở project trên xcode.
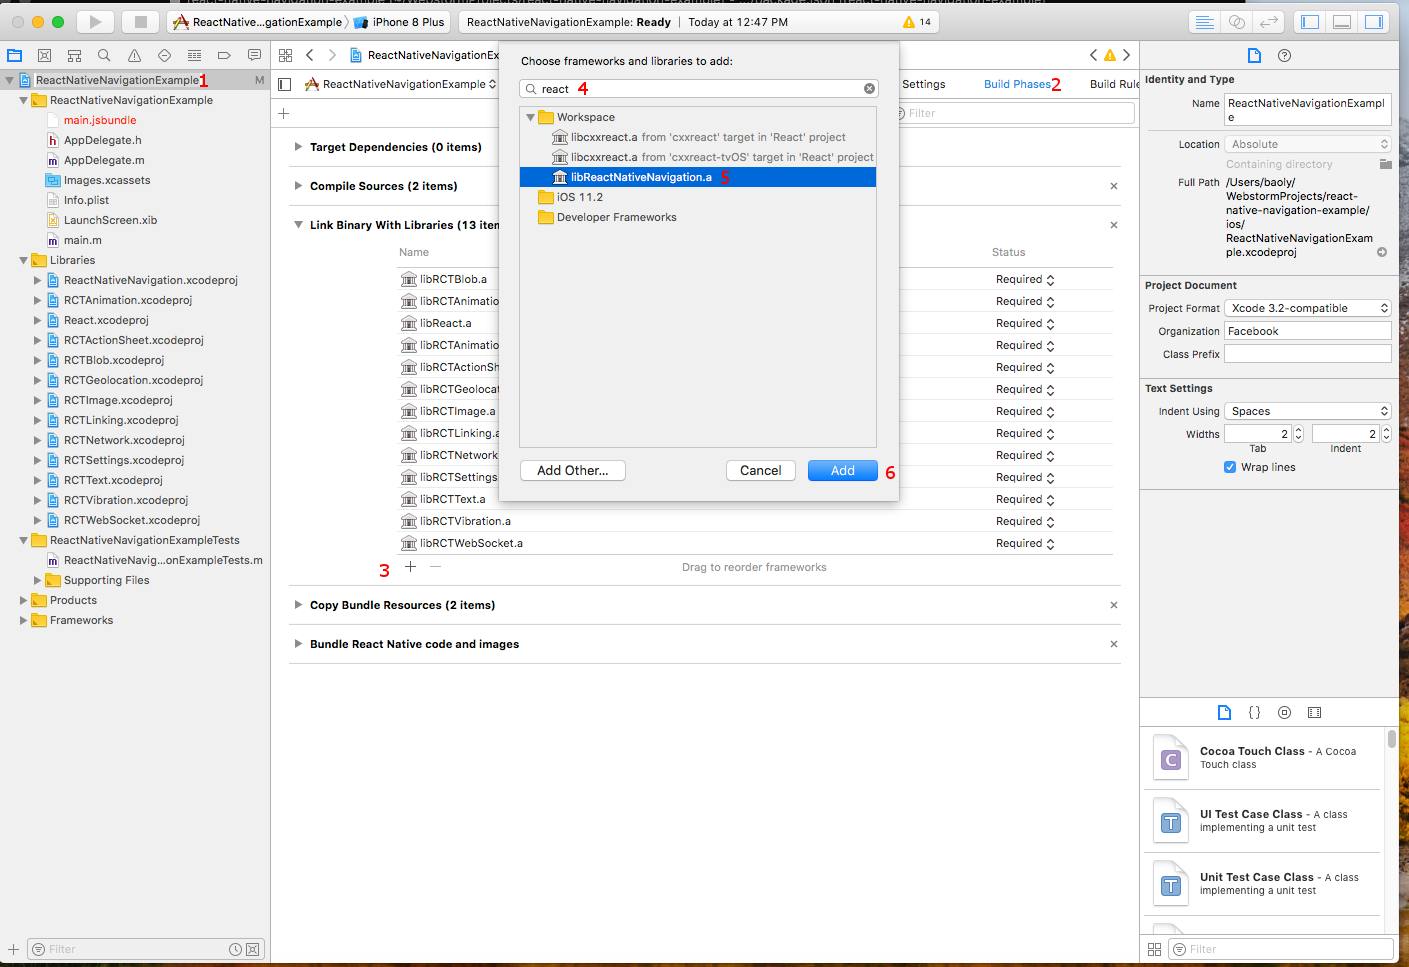
Trong Xcode, click chuột phải vào Libraries > Add files to "ReactNativeNavigationExample". Sau đó trỏ đường dẫn đến file ReactNativeNavigation.xcodeproj
./node_modules/react-native-navigation/ios/ReactNativeNavigation.xcodeproj
Link thư viện vào ios project
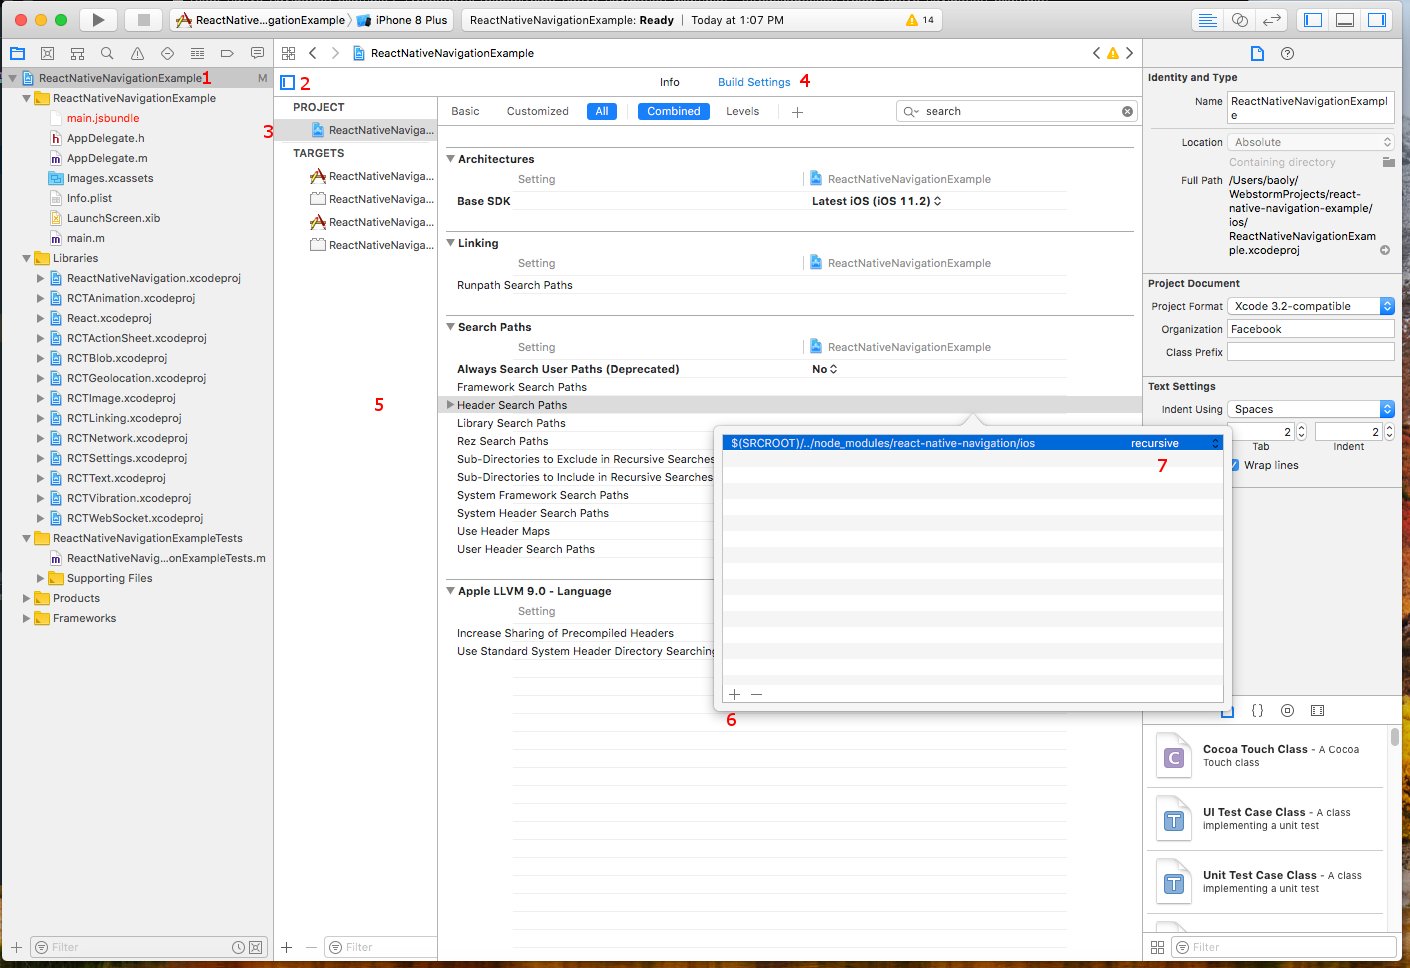
Và thêm tiếp đường dẫn này vào
$(SRCROOT)/../node_modules/react-native-navigation/ios
Vẫn trong Xcode, mở file AppDelegate.m. và sửa lại như sau
/**
 * Copyright (c) 2015-present, Facebook, Inc.
 * All rights reserved.
 *
 * This source code is licensed under the BSD-style license found in the
 * LICENSE file in the root directory of this source tree. An additional grant
 * of patent rights can be found in the PATENTS file in the same directory.
 */

#import "AppDelegate.h"

#import
#import

// **********************************************
// *** CAN PHAI THEM DONG NAY                 ***
// **********************************************
#import "RCCManager.h"


@implementation AppDelegate

- (BOOL)application:(UIApplication *)application didFinishLaunchingWithOptions:(NSDictionary *)launchOptions
{
  NSURL *jsCodeLocation;

  jsCodeLocation = [[RCTBundleURLProvider sharedSettings] jsBundleURLForBundleRoot:@"index" fallbackResource:nil];


  // **********************************************
  // *** CAN PHAI THEM DOAN NAY                 ***
  // **********************************************
  self.window = [[UIWindow alloc] initWithFrame:[UIScreen mainScreen].bounds];
  self.window.backgroundColor = [UIColor whiteColor];
  [[RCCManager sharedInstance] initBridgeWithBundleURL:jsCodeLocation launchOptions:launchOptions];


  // **********************************************
  // *** COMMENT PHAN NAY LAI                   ***
  // **********************************************
//  RCTRootView *rootView = [[RCTRootView alloc] initWithBundleURL:jsCodeLocation
//                                                      moduleName:@"ReactNativeNavigationExample"
//                                               initialProperties:nil
//                                                   launchOptions:launchOptions];
//  rootView.backgroundColor = [[UIColor alloc] initWithRed:1.0f green:1.0f blue:1.0f alpha:1];
//
//  self.window = [[UIWindow alloc] initWithFrame:[UIScreen mainScreen].bounds];
//  UIViewController *rootViewController = [UIViewController new];
//  rootViewController.view = rootView;
//  self.window.rootViewController = rootViewController;
//  [self.window makeKeyAndVisible];
  return YES;
}

@end
Sử dung React Native Navigation (RNN)
Cách thức hoạt động của RNN sẽ là thành phần native đầu tiên được chạy. Và nó sẽ load những thành phần khác của chúng ta. Nên cách khai báo hơi khác so với project React Native bình thường.
Bước 1 - Thay đổi cách chạy app
Sửa lại như sau trong file
index.js
import { AppRegistry } from 'react-native';
import App from './App';
app.js
import { Navigation } from 'react-native-navigation';

import { registerScreens } from './screens';

registerScreens(); // GOI HAM NAY DE DANG KY APP

// BAN CO THE BAT DAU APP DANG TAB HAY DANG MOT SCREEN DUY NHAT
Navigation.startTabBasedApp({
    tabs: [
        {
            label: 'One',
            screen: 'example.FirstTabScreen', // this is a registered name for a screen
            icon: require('../img/one.png'),
            selectedIcon: require('../img/one_selected.png'), // iOS only
            title: 'Screen One'
        },
        {
            label: 'Two',
            screen: 'example.SecondTabScreen',
            icon: require('../img/two.png'),
            selectedIcon: require('../img/two_selected.png'), // iOS only
            title: 'Screen Two'
        }
    ]
});
Bước 2 - Đăng ký các screen component
Screen component có nghĩa là component nào mà bạn có thể đặt được nó vào các tab, hay là đẩy một màn hình giao mới vào navitation stack.. Tạo thư mục screens trong project chính và tạo file screens/index.js
import { Navigation } from 'react-native-navigation';

import FirstTabScreen from './FirstTabScreen';
import SecondTabScreen from './SecondTabScreen';
import PushedScreen from './PushedScreen';

// DANG KY TAT CA CAC SCREEN CHO APP
export function registerScreens() {
    Navigation.registerComponent('example.FirstTabScreen', () => FirstTabScreen);
    Navigation.registerComponent('example.SecondTabScreen', () => SecondTabScreen);
    Navigation.registerComponent('example.PushedScreen', () => PushedScreen);
}
Tìm hiểu document của RNN
Trong ví dụ trên tôi muốn hướng dẫn một cách đơn giản nhất có thể để bạn hiểu. Để app dụng vào thực tế không có cách nào khác là bạn phải đọc tài liệu chi tiết về thư viện này: https://wix.github.io/react-native-navigation. Để tóm tắt lại
Code demo trong bài này: https://github.com/pogofdev/react-native-navigation-example
Code demo hoàn chỉnh: https://github.com/wix/react-native-navigation/tree/master/example
Những API static có liên quan đến tổng thể của thư viện như để đăng ký screen component, chạy một giao diện dạng tab, chạy một giao diện đơn, hiện/ tắt modal...
https://wix.github.io/react-native-navigation/#/top-level-api
Những API liên quan đến từng screen. Ví dụ như push, pop một screen mới khi đang ở screen hiện tại. show modal....
https://wix.github.io/react-native-navigation/#/screen-api
Một cái hay của RNN là Deep Link. Nó cho phép chúng ta truyền thông tin (notification) hoặc dữ liệu (payload) từ tab này sang tab khác hoặc screen này sang screen khác dưới dạng sự kiện.
https://wix.github.io/react-native-navigation/#/deep-links
Để chỉnh sửa giao diện theo ý muốn
https://wix.github.io/react-native-navigation/#/styling-the-navigator
Ngoài ra RNN còn hỗ trợ các thư viện thứ 3 khác: Redux, Mobx,...
https://wix.github.io/react-native-navigation/#/third-party-libraries-support


